Quick Tutorial
Here is a very basic quick tutorial on how to use DVD-lab. We will barely scratch the surface of the complete feature set of DVD-lab, but it will give you a basic overall idea how things are done.
DVD-lab supports elementary Video and Audio stream file types (mpv, m2v, mpa, m2a, ac3, dts, wav, aiff) or system files (an mpg file with both Video and Audio inside) also called a "Program Stream" for MPEG-2 files.
Import content into the Asset window
First, we need content. Import the Video and Audio files that you intend to use for the DVD into the Assets bin. To do so, you can Drag & Drop files from Windows Explorer into the Assets bin or Drag & Drop files from the built-in File viewer into the Project specific Asset - Video & Audio bin.
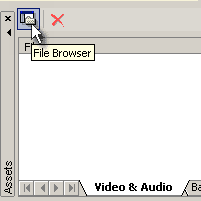 |
In the Asset window, click the File Browser button
This will open the internal File Browser which displays only files that can be imported. Browse to the directory where your Video files are and either Drag & Drop them into the Asset bin or double-click on them.
|
DVD-lab will quickly check the files and display any warnings. If you are importing a system or program stream, the file will be demultiplexed in the background. Demultiplexing means separating a combined file into it's component Video and Audio element files as shown here.

When everything is OK, you can continue building the DVD.
Making a Movie object
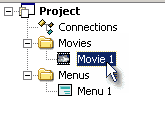 |
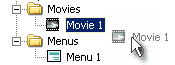
Open the Movie 1 if it is not already open by double-clicking on it in the Project window:
|
Now, Drag & Drop aVideo file from the Asset bin into the Movie 1 window. Next, Drag & Drop the Audio file for that Video there as well, into the Audio track.
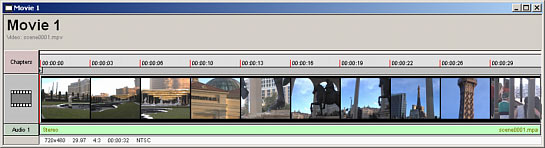
Now you have created your first Movie title. You can now click on the thumbnails in the Movie window and drag the Movie cursor along the length of the Movie. Watch the preview window to see where you are.
Adding Chapter Points
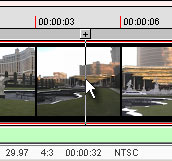 |
When you see a frame of the Video that you would like to use for a Chapter Point, you can stop and press the [+] button on top of the Movie Cursor. This will add a Chapter Point, shown by the red marker.
|
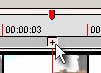 |
Note: you don't need to add a Chapter Point at the beginning of the movie, that's done automatically.
Now enter a few more Chapter Points this time by clicking the "Add Chapter Point" button found in the Preview window's toolsets.
Building a Menu
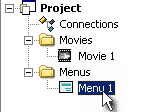 |
Open the Menu 1 by double-clicking on it in the Project window.
|
An empty Menu will appear.
You can zoom the screen in or out with the zoom buttons on the main toolbar:

Choose a Menu Background
In the Asset window, click the Backgrounds tab:
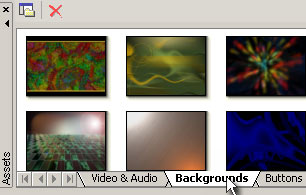
You will see a number of backgrounds available for use in your Menu. Pick one, Drag & Drop it into the Menu. This becomes that Menu's background graphic image.
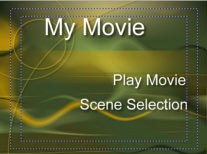
Menu toolsets are found along the top and left side of the Menu editing window. From the left side toolsets, select the text tool (Aa) and then click anywhere on the Menu screen that a text item should be placed.

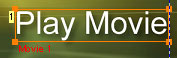
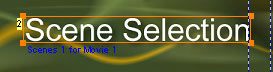
A text window will appear where you can type a title like "My Movie", for example. Now, click OK and place and resize the text to the desired position. Add another smaller text object like "Play Movie" and yet another "Scene Selection".
Making a Linked Button
To add a link from the text to a Movie, simply drag the Movie 1 item from the Project window over the "Play Movie" text and release the mouse button. The link will be created for you. Pretty easy, wasn't it?
Using Scene Selection
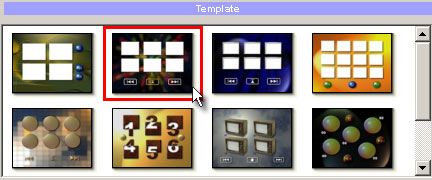
Now click on the Wizard button found on the Main toolbar and from the context menu select Add Scene Selection Menus, as shown here.

A Template window will open and from there pick a template you like for your scene selections.
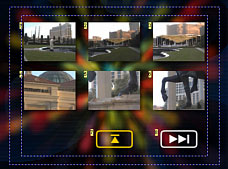
DVD-lab will proceed to populate your template with buttons linked to the defined Chapter Points, creating a new, very complete Menu or Menus. Depending on how many Chapter Points you added, one or more new Menus will be created.
You can now open the new Menu by double-clicking on it's name in the Project window. DVD-lab did a lot of the work for you already in building this Menu.
Making a Menu link
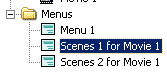
We are almost done, but remember; we don't yet have a link from the first Menu 1 to the selection Menus.
Open the Menu 1 item and from the Project window drag the Scenes 1 for Movie 1 marker, dropping it on top of the "Scene Selection" text.
The design phase is now done!
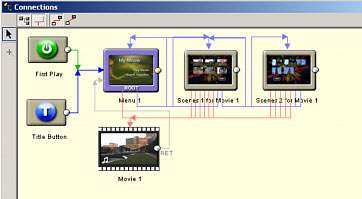
You can open the Connection view by double-clicking on the Connection item in the Project window. This is your visual navigation layout of the DVD. The Connection view shows the relationships between items. We will get into more detail on this later. For now you don't have to change anything. DVD-lab has made all of these Connections for you.
Building the DVD
With the layout and design completed, you are now ready to build a DVD. Click the Compile DVD button found in the top DVD-lab menu.

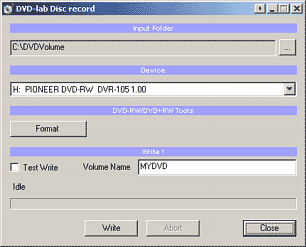
In the Compile window, select a destination folder and a temporary folder on your hard disk. You will benefit in speed of compile if you select two different disks. These folders should be on a drive with plenty of free disk space.
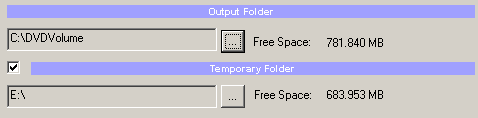
Click the Start button and the DVD files will be created in the specified folder (ex: C:\DVDVolume).
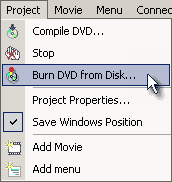
You can now test the performance of your DVD Project with a software player such as PowerDVD, CinePlayer, WinDVD and others. Next, burn the Project to DVD media using the Burn DVD from disk command:
You can also use your favorite DVD recording application such as Nero, Gear or Roxio to burn the DVD as well.
What did you learn:
- First, you need to drag your content files to the Video & Audio Asset window for checking of the formats
- You learned how to add chapters
- You learned how to add links to the buttons on Menus
- You learned how to use the wizard to add Scene Selection Menus
- You learned that you need to first compile the DVD to hard disk and then record (burn) to DVD media